
These fun and festive Easter egg cookies are the best dessert for Spring! The cookie base is sweet, soft, and buttery, topped with beautiful pastel royal icing as a colorful finishing touch!
Easter is just around the corner! Get your dessert lineup ready with these other tasty recipes! Easter cake, lavender cupcakes, and carrot cake cookies are just a few of my many favorites! Find my full list here.

Easter Egg Sugar Cookies With Royal Icing
You can’t go wrong with sugar cookies! They’re so buttery and soft, and you can frost them with whatever design you want! To get in the Easter spirit, today’s cookies are cute pastel Easter eggs to brighten up any party. I used royal icing to get the most precise design, but you can use your favorite frosting here instead! Buttercream and cream cheese frosting are both tasty choices!
These Easter egg sugar cookies are a great activity for the kids. I’ve included 3 designs to help get you started, but I think the fun part is coming up with your own! In no time, you’ll have sugar cookies that not only taste amazing but look amazing too! If you’re looking for more festive, delicious treats, you’ll have to try these awesome no-bake bird’s nest cookies, too! Making fun, themed treats is one of my favorite parts about holidays.
Sugar Cookie Ingredients
These Easter egg sugar cookies use a lot of basic baking ingredients which makes preparation a breeze! The only item I needed to get from the store was meringue powder for the royal icing. (This acts as a replacement for egg whites. Super useful if you’re wanting bakery-worthy icing without the hassle!) If you’re looking for measurements, they can all be found in the recipe card at the end of the post.
- All-Purpose Flour: Gives the cookies a light structure.
- Salt: A pinch is added to enhance the overall flavor!
- Baking Powder: Baking powder is a must for light, soft cookies! Your cookies will turn out hard and dense if you don’t add it in.
- Unsalted Butter: For richness and moisture.
- Granulated Sugar: Gives your Easter egg sugar cookies the perfect amount of sweetness.
- Egg Yolks: Egg yolks tenderize your dough, leaving you with a tender, more chewy cookie!
- Sour Cream: The secret ingredient for ultra-soft cookies!
- Vanilla Extract: A must for deep, complex flavor.
- Lemon Extract: (Optional) I like to add a little lemon extract for a pop of zesty flavor! Lemon desserts are perfect for spring!
Ingredients for Royal Icing
- Powdered Sugar: Powdered sugar adds sweetness to your icing but also makes it nice and smooth.
- Meringue Powder: This is a substitute for egg whites! Wanting to use egg whites instead? See my tips section below!
- Water: For adjusting consistency.
- Gel Food Coloring: I like using gel food coloring instead of liquid because it gives your icing more clarity and vibrance.
How to Make Easter Egg Sugar Cookies
This is a quick and easy recipe to make for all of your Spring get-togethers! Did I mention it only takes 8 minutes for the cookies to bake? Then all you’ve got to do is frost them! That’s my favorite part. Adding cute designs and seeing the Easter eggs take shape is so exciting!
- Preheat Oven, Prep Cookie Sheets: First, preheat the oven to 350°F and line 2-3 cookie sheets with parchment paper.
- Dry Ingredients: In a medium bowl, whisk together the flour, salt, and baking powder. Set aside.
- Wet Ingredients: In another medium bowl, beat together the butter and sugar for 2-3 minutes until light and fluffy. Add the egg yolks, sour cream, and extracts and mix until combined.
- Mix Wet and Dry Ingredients Together: Add the dry ingredients to the wet and mix until combined.
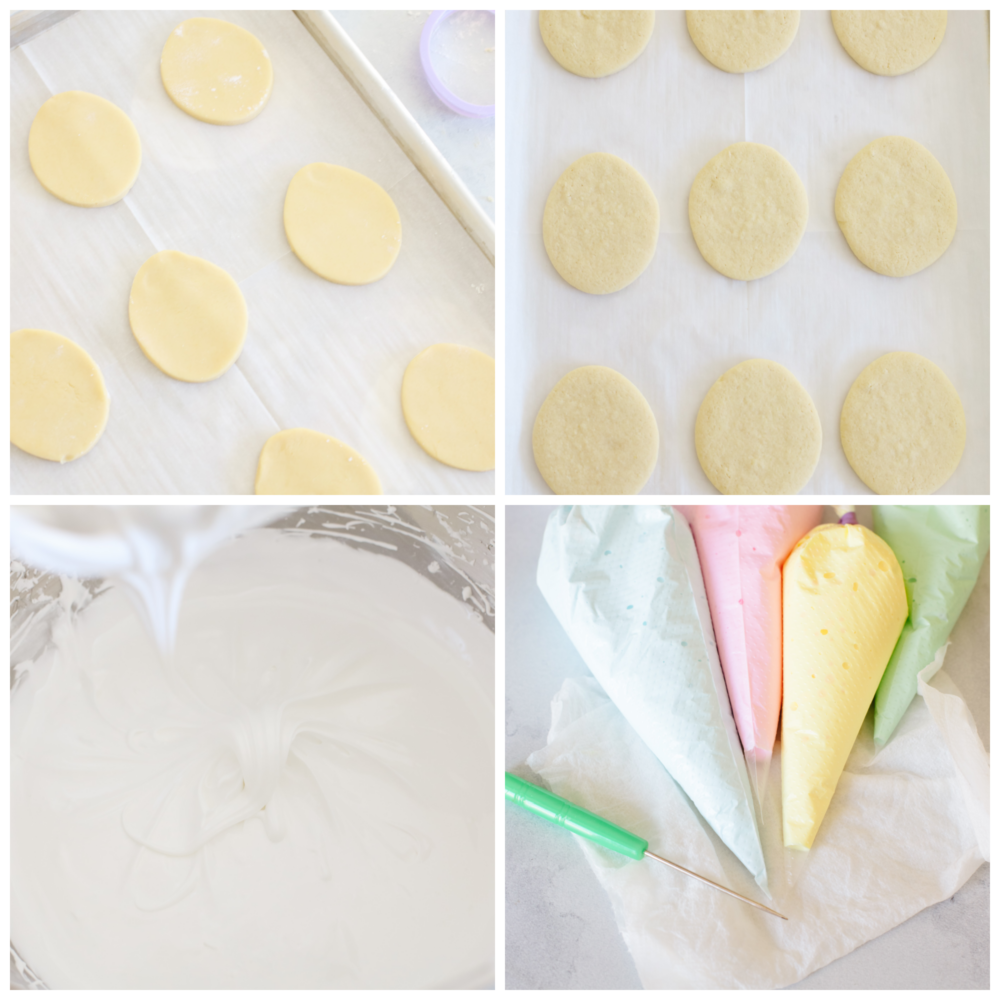
- Shape: Split the dough into 2-3 pieces and roll them one at a time on a lightly floured surface until they are ¼ inch thick. Use your favorite cookie cutters to cut out your cookies. Press the scraps together and set aside to rest for about 5 minutes. Reroll the scraps and cut more cookies until all the dough has been used.
- Bake: Place the cookies on the parchment-lined cookie sheets leaving 1 ½ inches between them. Bake for 6-8 minutes, rotating the pan at 4 minutes. I find this gives the cookies a nice, even bake. The edges will be just set and the cookies will be very light in color and should have very minimal coloring underneath them.
- Cool and Frost: Let the cookies cool on the pan for 2 minutes for the shape to set before transferring to a cooling rack. Frost once they are cooled or store in an airtight container until you are ready to frost them.
Preparing the Royal Icing
- Mix Dry Ingredients: Using an electric mixer with the whisk attachment, mix the powdered sugar and meringue powder together on low.
- Stiff Frosting: Next, add 8 tablespoons of water and mix together on high speed for about 2 minutes. The icing should be pretty stiff. Add additional water 1 tablespoon at a time until the icing is about the consistency of soft-serve ice cream and forms soft peaks. Reserve 1 cup of frosting and cover tightly with plastic wrap.
- Filler Frosting: With the remaining icing, add additional water 1-2 teaspoons at a time until when the whisk is raised the icing drips back into the bowl and the lines of icing take about 10 seconds to melt back into the icing. This is the thin icing that will be used to fill, or flood, your cookies. Separate into small bowls and tint the icing with your chosen colors. Cover each bowl tightly with plastic wrap when not being used. This icing will dry very quickly.
Tips for Sugar Cookies and Royal Icing
These Easter egg sugar cookies are super easy to make, but a few simple steps will help you achieve a bakery-worthy result! I hope you love these adorable cookies as much as I do!
- Don’t Overmix: In order for your sugar cookies to turn out as soft and chewy as possible, only mix your batter until combined. If you overmix, gluten may develop and leave your cookies hard and rubbery.
- Using Egg Whites: If you prefer, you can swap out meringue powder for raw egg whites. For every 2 tablespoons of meringue powder used, you can substitute 1 egg white.
- Is My Royal Icing the Right Consistency? To make sure your royal icing is ready to use, use a spoon to scoop icing out of the bowl. Slowly pour it back in. When it drips back in, if it melts back into the icing in 10 seconds, you have the right consistency. If the mixture is too thick, add more water 1 teaspoon at a time. Similarly, if the icing is too thin, add more powdered sugar 1 tablespoon at a time. Note: For the Easter egg designs, you will need both thick icing and thin icing for filling/flooding. If you feel confident, you can try piping with just the thinner icing, but be careful to leave space on the edge of the cookie so the icing doesn’t run over the edge.
Piping Cookie Designs
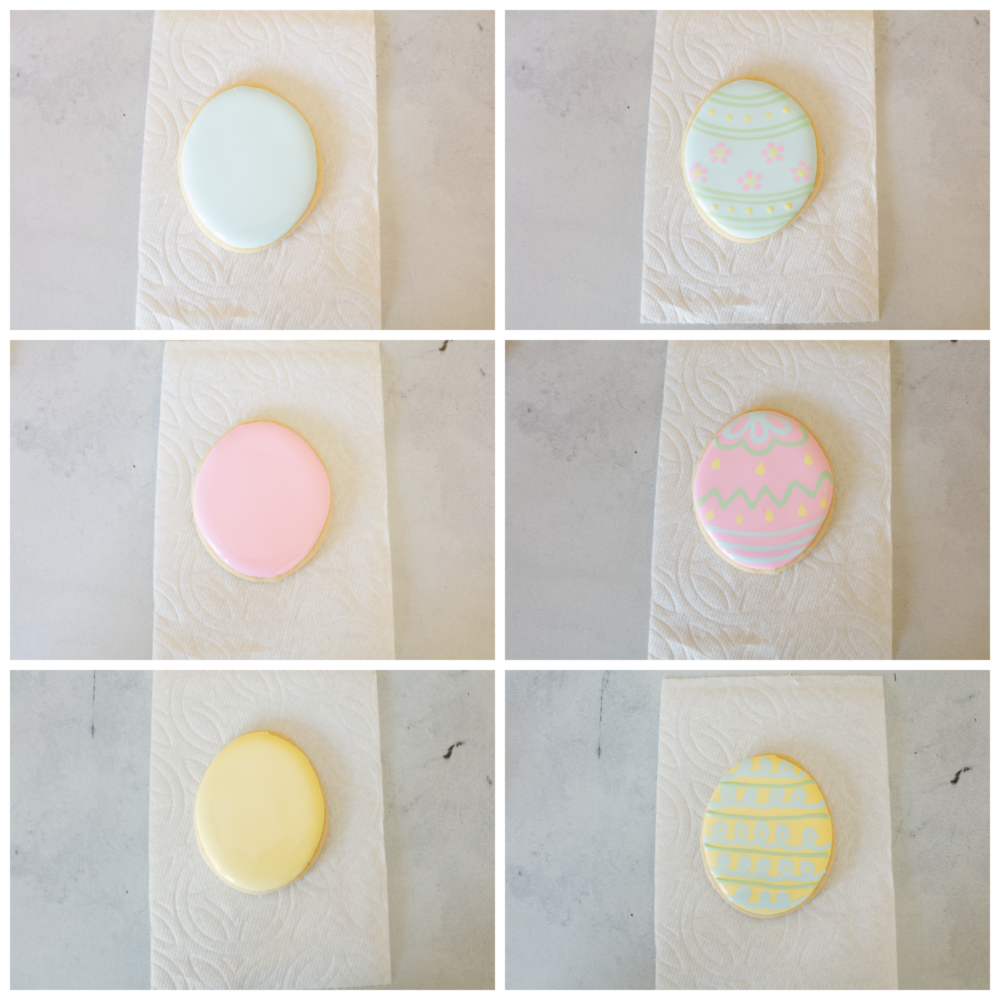
Blue Cookie: Flood the egg with blue icing. While the icing is still wet, work quickly and pipe 4 pairs of green lines. Pipe yellow dots between the top two pairs of green lines and the bottom green lines. Pipe five yellow dots in the center of the cookie to be the centers of your flowers. Use the pink icing to pipe five dots around each flower center.
Pink Cookie: Flood the egg with pink icing. While the icing is still wet, use the blue to pipe three lines at the bottom of the egg and three loops at the top to look like a flower. Use green to pipe a zigzag in the center of the cookie and to outline the blue loops at the top. Use the yellow to make dots above and below the zigzag. If you want to make them look like tear drops, use a toothpick or a scribe tool to drag the top of the dot upwards. Wipe the toothpick or scribe off between making each teardrop.
Yellow cookie: Flood the egg with yellow icing. Use green to make 4 lines across the cookie. Use blue to make 5 swirly likes across the egg.
Frosting Tips
Royal icing can be tricky to work with, but if you keep these simple tips in mind you’ll be decorating your cookies like a pro!
- Wet-On-Wet Technique: These Easter egg designs use a wet-on-wet decorating technique. This means the icing for the base of the cookie should still be very wet when the details are piped on. This allows the details to sink into the base icing and it creates a nice smooth surface. You have to work very quickly and decorate each cookie from start to finish before moving to the next, otherwise the icing will form a crust and the details won’t sink in.
- Piping Tip Or Piping Bag? For these cookies you can either use a very small piping tip, a #1, #1.5, or #2, or you can use a piping bag with the very end snipped off. If you use just a piping bag, snip the very tiniest amount off and test by squeezing a little icing out. If it’s not big enough, cut another tiny bit off the bag until you get the right size. It should be small enough to make a clean line and not curl around the tip of the bag, but not wide enough to pool out of the bag on it’s own. It’s always best to start very small and work up instead of cutting big and having to get another bag.
- Keep Icing From Drying Out: Royal icing likes to start drying and forms a crust very quickly. When you are not using a bowl or piping bag, use damp paper towels and plastic wrap to cover them. Wrap bowls in plastic wrap between use and cover the tips of piping bags with a damp paper towel to prevent them from crusting over between using different colors.
- Let Icing Fully dry: Let the iced cookies sit out overnight to allow the icing to fully set before serving them. Don’t cover them with plastic wrap or place them in a covered container, otherwise the icing will take much longer to set. The icing prevents the cookie from drying out.

Storing Leftover Easter Egg Sugar Cookies
The great thing about using royal icing as frosting is that you can store your cookies at room temperature! These Easter egg sugar cookies have a longer shelf life than most other cookies, making them a tasty treat to snack on during the week!
- At Room Temperature: First, make sure your royal icing has set completely. Store cookies in an airtight container or cover with plastic wrap. Your cookies will stay good for one week.


Easter Egg Sugar Cookies
Ingredients
- 2 Cups All Purpose Flour
- ½ Teaspoon Salt
- ½ Teaspoon Baking Powder
- ½ Cup Unsalted Butter Softened
- 2/3 Cup Granulated Sugar
- 2 Egg Yolks
- 2 Tablespoons Sour Cream
- 1 ½ Tablespoon Vanilla Extract
- 1 Teaspoon Lemon Extract optional
Royal Icing
- 4 Cups Powdered Sugar sifted
- 3 Tablespoons Meringue Powder
- 9-12 Tablespoons Water Room Temperature
- Gel Food Coloring
Instructions
-
Preheat the oven to 350° and line 2-3 cookie sheets with parchment paper.
-
In a medium bowl whisk together the flour, salt, and baking powder. Set aside.
-
In another medium bowl, beat together the butter and sugar for 2-3 minutes until light and fluffy. Add the egg yolks, sour cream, and extracts and mix until just combined.
-
Add the dry ingredients to the wet and mix until just barely combined.
-
This recipe does not require any chilling time, so you’re ready to roll out your cookies! Split the dough into 2-3 pieces and roll them one at a time on a lightly floured surface until they are ¼ inch thick. Use your favorite Christmas tree cookie cutters (or alternative shapes!) to cut out your cookies. Press the scraps together and set them aside to rest for about 5 minutes. Reroll the scraps and cut more cookies until all the dough has been used.
-
Place the cookies on the parchment-lined cookie sheets leaving 1 ½ inches between them. Bake for 6-8 minutes, rotating the pan at 4 minutes. I find this gives the cookies a nice, even bake. The edges will be just set and the cookies will be very light in color and should have very minimal coloring underneath them.
-
Let the cookies cool on the pan for 2 minutes for the shape to set before transferring them to a cooling rack. Frost, once they are cooled then store in an airtight container until you are ready to frost them.
Royal Icing
-
Using an electric mixer with the whisk attachment, mix the powdered sugar and meringue powder together on low.
-
Add 8 tablespoons of water and mix together on high speed for about 2 minutes. The icing should be pretty stiff. Add additional water 1 tablespoon at a time until the icing is about the consistency of soft-serve ice cream and forms soft peaks. Reserve 1 cup of frosting and cover tightly with plastic wrap.
-
With the remaining icing, add additional water 1-2 teaspoons at a time until when the whisk is raised the icing drips back into the bowl and the lines of icing take about 10 seconds to melt back into the icing. This is the thin icing that will be used to fill, or flood, your cookies. Separate into small bowls and tint the icing with your chosen colors. Cover each bowl tightly with plastic wrap when not being used. This icing will dry very quickly.
Nutrition
from The Recipe Critic https://ift.tt/SGYc42E





No comments:
Post a Comment